Categories
Others

Do Not Judge Diamonds by Certificates Alone

Not all diamonds are worth buying!!!
Both milky tint and brown hue:Tap to see full diamond info
This diamond has milky:Click view detailed diamond information
This diamond has green fluorescence.:View diamond details
This diamond has a cavity:See the diamond details

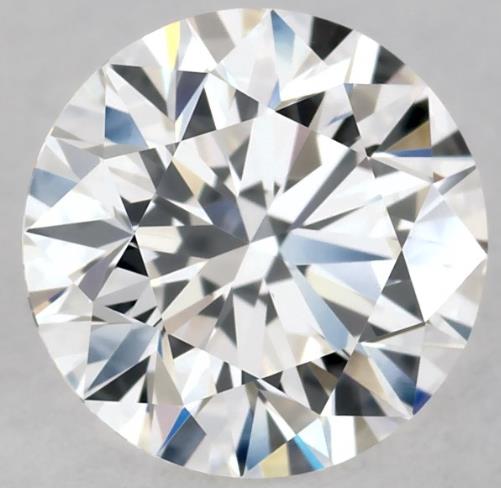
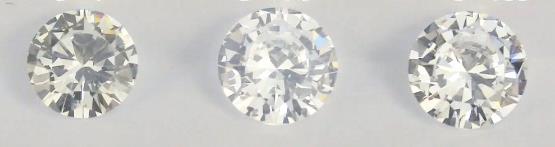
Buying diamonds just based on certificates is a very risky move. You may end up with a stone that has perfect data on paper, but looks disappointing in real life. Certificates like GIA reports work like ID cards for diamonds. They prove the basic features and official grades, but they can never guarantee how beautiful a diamond looks. Buying a diamond only with a certificate is just like hiring an employee only by their resume. A resume, which is similar to a diamond certificate, shows education, work experience and skills, just like the 4C standards on a report. But you cannot tell their real work attitude, communication skills and team work spirit. These equal to a diamond’s actual look and sparkle. If you do not want to spend a lot of money and feel regret later, you must check both the certificate and the real diamond. Do not just pay for a nice report. Choose a diamond that is truly bright and stunning.
AGS

Here are the main problems you may face if you only trust the certificate. First, you will miss the most important part: real appearance and optical performance. The 4Cs including color, clarity, cut and carat weight are graded by lab experts under controlled environment. However, people wear diamonds to admire their beauty, not to lock the certificate in a safe. Many people fall into the trap of milky diamonds or coffee diamonds. Some diamonds have massive cloud inclusions inside. They look foggy and hazy, which we call milky diamonds. Some carry obvious brown tones, known as coffee diamonds. Even if their clarity grade is not low, such as SI1 or VS2, those clouds will badly hurt brightness and transparency. The diamond looks dull and lifeless. Sadly, this kind of visual problem are not noted on most certificates.

A top Excellent cut does not always mean great sparkle and fire. There is a big range within the Excellent grade. Two diamonds both marked Excellent cut can be totally different. One with cut proportions just meeting the standard, and another with perfect proportions. Their sparkle, fire and brightness can have huge gaps. You can never know these differences only from a piece of paper.

Poor symmetry and polish are also common issues. Bad symmetry makes the table tilt and girdle uneven. It blocks light reflection and ruins the overall beauty. These details are written on certificates, but ordinary people can not imagine how bad they look in real view.

Second, you cannot judge a diamond’s unique charm and beauty. Every diamond is just like a person, it has its own style.

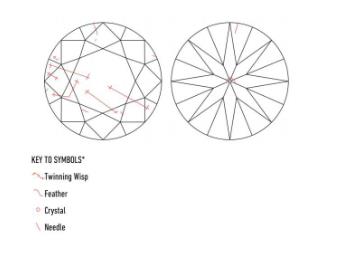
The position and visibility of inclusions matter a lot. Take two VS1 diamonds for example. One has inclusions hidden at the pavilion, so you can not see them from the top table. The other has marks right in the center of the table, just like obvious dust. The plotting diagram on the certificate marks the position, but you need to see the stone in person or watch professional photos to tell how noticeable it is.

Diamond fluorescence also creates different visual effects. Certificates mark fluorescence levels: none, faint, medium, strong and very strong. Strong fluorescence may make diamonds look foggy under sunlight and reduce clarity. On the other side, faint to medium fluorescence can make slightly yellow diamonds such as color J and K look whiter. This is a visual feeling you have to see yourself, you cannot tell good or bad just from words.

Third, you may buy so-called “data diamonds”. Many online sellers and wholesalers sell this kind of stones. They have perfect certificate data, but plain and ugly appearance. They know many buyers trust GIA reports and 4C numbers too much. They buy these flawed diamonds at low cost, then sell them with the slogan of high cost performance. You think you get a good deal, but actually you get a dull diamond with no shine.

Now let’s talk about the right way to buy diamonds: combine certificate check and real product evaluation.

A certificate is necessary for reference and quality guarantee, but it is not everything. Follow these steps.

Set your budget and 4C range first. Use the 4C rules to narrow down your choices. Read the plotting diagram carefully. Stay away from diamonds with inclusions on the table center or large cloud inclusions. Also make your choice on fluorescence level.

The most important step is to view the real diamond or watch professional videos.

If you visit physical stores, check diamonds under professional lights and natural daylight. Compare fire, brightness and transparency between different stones. Ask the shop staff to put several options together for comparison.

If you shop online, pick reliable sellers. Choose stores that provide high-definition magnified videos, 360° views, ASET and Idealscope images. James Allen ( note in 2026, james allen has joined bluenile) and Blue Nile are trustable online jewelry stores. These materials clearly show a diamond’s optical performance, making up for the lack of in-person viewing. Videos are much more reliable than static pictures.

Last, work with reputable jewelers or diamond consultants. They have rich experience and can guide you to avoid common traps.
Categories
Jewelry Others

GIA Lab Grown Diamond Certificate

Not all diamonds are worth buying!!!
Both milky tint and brown hue:Tap to see full diamond info
This diamond has milky:Click view detailed diamond information
This diamond has green fluorescence.:View diamond details
This diamond has a cavity:See the diamond details

GIA, the Gemological Institute of America, do issue official certificates for laboratory-grown diamonds. However, these documents are quite different from the certificates for natural diamonds in names, contents and main purposes. It is very important for every buyer to tell them apart clearly. Here is the full and detailed explanation.

GIA Lab-Grown Diamond Report vs GIA Natural Diamond Grading Report

We list the key differences between the two types of certificates below.

Document Name

GIA Laboratory-Grown Diamond Report for man-made diamonds.

GIA Diamond Grading Report for natural diamonds.

Main Purpose

The lab-grown report focus on identification and grading. It confirm the stone is made in lab, and grade its four key factors: color, clarity, cut and carat weight.

The natural diamond report do identification, grading and also act as a guarantee. Besides 4C grades, it proves the diamond is natural and supports its market value.

Key Contents

For GIA lab-grown diamond report:

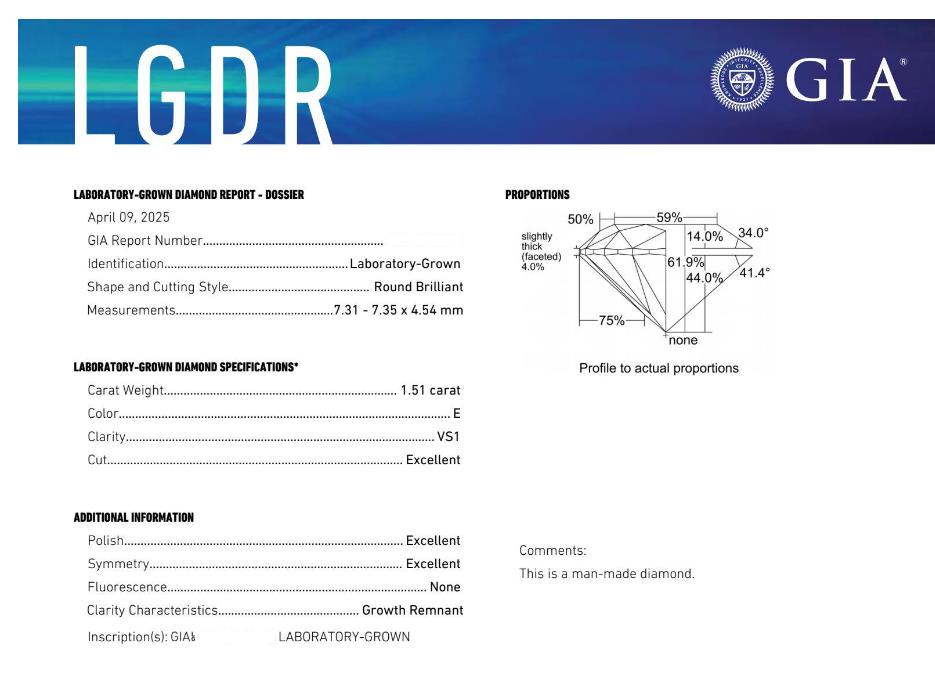
It clearly mark the words “Laboratory-Grown”. It state the production method, either CVD or HPHT. The report includes standard 4C grades, clarity plot, proportion diagram and a QR code. You can scan the code to check the electronic report online.

For GIA natural diamond grading report:

It is marked “Natural Diamond”. It has complete 4C grades, clarity plot and proportion diagram. It also record fluorescence details. Some diamonds have laser engraved GIA code on the girdle, which is optional. A QR code is also printed for online inquiry.

GIA Lab-Grown Diamond Report

Grading Standards for Color & Clarity

Lab-grown diamonds use the same standard as natural ones. It follow D-Z color scale and FL to I3 clarity scale. Natural diamonds use exactly the same D-Z color grades and FL-I3 clarity grades too.

Most Obvious Differences

The lab-grown certificate has a light blue background. Large “LABORATORY-GROWN” watermarks cover the grading areas. This design stop people from altering the paper or mixing up two kinds of diamonds.

The natural diamond certificate is classic white, with no lab-grown watermark at all.

Girdle Engraving

Lab-grown diamonds are laser engraved with “LABORATORY-GROWN” and the report number on the girdle.

Natural diamonds are engraved with GIA report number, and sometimes with the GIA diamond symbol.

GIA carry out very strict checks on lab-grown diamonds. All information is fully open and transparent. This make sure customers know exactly what they buy, and avoid confusion between lab-grown and natural diamonds.

How to Read a GIA Lab-Grown Diamond Certificate

You can check sample reports on GIA official page: GIA Report Check – Laboratory-Grown Diamond. Here is how you understand the key parts.

Report Type: It will show Laboratory-Grown Diamond Report directly.

Grade Scale: It notes that color and clarity grades use the same rules as natural diamonds.

Comments: This area writes clearly: This is a man-made diamond grown by CVD or HPHT method.

Background & Watermark: The light blue color and big “LABORATORY-GROWN” watermarks are the easiest features to recognize.

Why Get a GIA Certificate for Lab-Grown Diamonds?

First, quality guarantee. GIA is one of the most famous and trusted gem institutes around the world. Its 4C standard is widely accepted by the whole jewelry industry. A GIA certificate means the diamond’s quality is checked by a fair third party.

Second, build trust. With clear information on production method and quality grade, customers will not be misled by dishonest sellers. Shopping will become much safer.

Third, price reference. Lab-grown diamonds do not rely on rarity for value, but their price still closely link to 4C grades. GIA certificates provide official quality standards for pricing and comparison.

Fourth, prevent disputes. The clear “Laboratory-Grown” label stop illegal sales behavior. No one can sell lab-grown diamonds as natural ones. It protect the rights of both buyers and sellers.

Certificates from Other Well-Known Institutes

Apart from GIA, many professional organizations also issue certificates for lab-grown diamonds.

IGI, the International Gemological Institute, is very popular. It holds a large market share in lab-grown diamond business. Its certificates are mostly blue and clearly marked “Laboratory Grown”.

HRD, the Antwerp Diamond High Council, is another top institute. It also provide professional identification reports for lab-grown diamonds.

NGTC, the National Gemstone Testing Center, is the most authoritative testing body in China. It also offer full inspection service for lab-grown diamonds.

All certificates from above institutes are reliable. When you shop for diamonds, always choose reports from these professional organizations. Remember these useful tips: Always ask for official certificates. Check if the number on certificate match the laser engraving on diamond girdle.

You need to know that lab-grown diamonds win people over for its beauty, eco-friendly production and great cost performance. They are not good choices for investment and value preservation. Hope all these information can help you a lot.

New Policy Update from GIA

GIA announced a big new rule in early June. Starting from late 2025, GIA will no longer use the traditional 4C grading system on laboratory-grown diamonds. The institute will apply a brand new descriptive rating system instead. In the future, lab-grown diamonds will only be divided into two ranks: Premium and Standard. Diamonds with poor quality will not get any grade at all. This new rule will further separate lab-grown diamonds from natural diamonds in the market.

Categories
Others

Types of Diamond Clarity Blemishes & Inclusions

Not all diamonds are worth buying!!!
Both milky tint and brown hue:Tap to see full diamond info
This diamond has milky:Click view detailed diamond information
This diamond has green fluorescence.:View diamond details
This diamond has a cavity:See the diamond details

Diamond Clarity shows the inside inclusions and outside surface marks of a stone. Every diamond has its own unique features formed during growth. If you often read diamond certificates, you will notice different internal and external flaws. Based on the GIA grading system, we explain all clarity features clearly. We divide them into two main parts: internal characteristics and external characteristics.

Internal Characteristics, also called Inclusions

These are flaws inside the diamond.

  • Crystal: Tiny mineral crystals inside the stone. They look like dots or thin lines, black or white. Black crystals are more easy to see, and hurt clarity grade more.
  • Feather: Internal cracks that look like feathers. Do not ignore its position. If the feather reach the surface, especially the girdle, hit may make crack bigger or even break the diamond. Small inner feathers are less risky.
  • Cloud: Made of countless tiny dots. It looks like fog inside the diamond. Thick and large cloud will turn the stone hazy, people call it milk diamond. It greatly cut down shine and value.
  • Pinpoint: Super small white dots. It is the mildest inclusion. Single pinpoint can not be seen by naked eyes. Many pinpoints together will form a cloud.
  • Needle: Long and thin white crystal inside. It rarely affect clarity, unless it is too long or too many.
  • Twinning Wisp: Lines or nets mixed with dots, clouds and crystals. It often appear in lab-grown diamonds. It is a weak structure. GIA report use red lines to mark it.
  • Internal Graining: Irregular lines from crystal growth. Experts need magnifier to see it. Serious graining will reduce transparency.
  • Cavity: Holes on the surface. It easily collect dirt and make the diamond less durable.
  • Indented Natural: Slight dents of original diamond surface near the girdle. It is natural feature, not damage. It hardly affect looks.
  • Knot: Crystal stretch to the surface. It is both internal and external flaw, and may weaken the stone.
  • Bearding: Tiny feather cracks around the girdle. Light bearding can be fixed by re-polishing. Heavy ones ruin look and durability.
  • Laser Drill Hole: Small holes made by laser to remove dark inclusions. This is a treatment. The hole is tiny and invisible to naked eyes. GIA will mark it on report.
  • Chip: Shallow breaks on edges. It is damage, easy to catch dust and reduce sturdiness.

External Characteristics, also called Blemishes

These are surface flaws. Most of them can be removed by re-polishing.

  • Natural: Original diamond surface near girdle. It is not a flaw, just natural mark.
  • Abrasion: Small wear marks on edges from friction. Easy to fix with polish.
  • Polish Lines: Fine parallel lines left during polishing. Good polish lines only show under 10x magnifier.
  • Scratch: Thin lines on surface. Can be polished away.
  • Pit: Tiny small holes on surface. It has little influence on clarity.
  • Nick: Mini gaps on facet edges. Simple polish can fix it.
  • Extra Facet: Extra cutting surface near girdle. It will not affect shine, only symmetry grade.

Clarity grade judge features under 10x magnifier, not the number of flaws. Our goal is to pick eye-clean diamonds.

First of all, stay away from milk diamonds and big cracks. Watch out for thick Cloud. Check if Feather run to the surface. Always trust official certificates like GIA or IGI. Their clarity diagrams tell you every flaw’s type and place.

For good value, VS1 and VS2 are great choose. Most inclusions can not be seen by eyes. Many SI1 diamonds are also eye-clean, you need to check carefully.

Seeing the real diamond is always best. Turn the stone under light. If it looks bright, clear and no dark spots or foggy look, it is a good diamond for you.

Categories
Others

Diamond inclusion – pinpoint

Not all diamonds are worth buying!!!
Both milky tint and brown hue:Tap to see full diamond info
This diamond has milky:Click view detailed diamond information
This diamond has green fluorescence.:View diamond details
This diamond has a cavity:See the diamond details

Pinpoints are tiny white crystal inclusions inside diamonds. They form when the diamond traps small mineral crystals or tiny empty spaces during its growth. Common trapped minerals include other diamond crystals and garnets. When viewed under a 10x magnifying lens, these features look like tiny white dots, just like the tip of a needle. As the name suggests, they are dot-like inclusions.

Pinpoint is one of the most common inclusions found in diamonds. Diamonds of nearly all clarity grades may contain pinpoints. They are also among the mildest inclusions you can find. A single pinpoint barely affects a diamond’s look or value. Buyers do not need to worry too much about this feature. When shopping for diamonds, you should pay more attention to the overall clarity grade and whether the stone is transparent and brilliant.

How Do Pinpoints Affect Diamonds?

The impact of pinpoints depends entirely on their quantity, size and position inside the diamond.

Single small pinpoint

It has almost no negative effects. A lone tiny pinpoint is hard to spot even with a 10x magnifier.

In terms of clarity grade, a single pinpoint may drop a diamond from IF (Internally Flawless) to VVS1 or VVS2 (Very Very Slightly Included). These are still top-tier clarity levels.

To the naked eye, this kind of pinpoint is completely invisible. It will never ruin the diamond’s beauty or sparkle.

diamond pinpoint

Clustered pinpoints

When three or more pinpoints gather closely together, they form another type of inclusion called a cloud. The area looks hazy and foggy.

If a cloud covers a large area and is very dense, the diamond will turn cloudy. People call this kind of stone a milky diamond. It will greatly reduce the diamond’s brightness and market value, so you need to watch out for this problem.

In most cases though, small clouds do not change the diamond’s appearance at all.

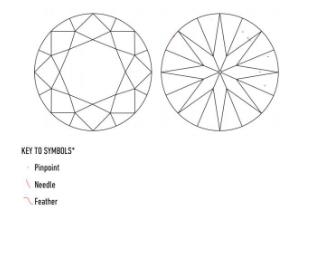
On the clarity plot of a GIA diamond report, pinpoints are marked with small red dots. Red marks stand for internal characteristics. If there are too many pinpoints to draw one by one, the report will add a note that says “Pinpoints are not shown”. This note means the diamond has a large number of tiny pinpoints. Gemologists will make a full evaluation of their total influence on clarity.

For most diamonds, pinpoints are harmless inclusions. One or several small pinpoints will not damage the diamond’s durability, nor will they affect its beauty during daily wear.

Even though pinpoints themselves are safe, you still need to check if they cluster into big clouds from the clarity diagram. If the report notes “Clouds are not shown”, you should ask the seller to check and make sure the diamond has no milky haze.

pinpoint in GIA certificate

GIA clarity grading has already taken the influence of pinpoints into consideration. If a diamond is graded SI1 or higher, including FL, IF, VVS1, VVS2, VS1, VS2 and SI1, its pinpoints are almost impossible to see with naked eyes. If you can, it is always better to check the diamond in person.

Turn the diamond under light. If it looks clear, bright and free of foggy texture, you have no reason to worry about existing pinpoints.

Categories
Jewelry Others

Lab grown diamond Phosphorescence

Not all diamonds are worth buying!!!
Both milky tint and brown hue:Tap to see full diamond info
This diamond has milky:Click view detailed diamond information
This diamond has green fluorescence.:View diamond details
This diamond has a cavity:See the diamond details

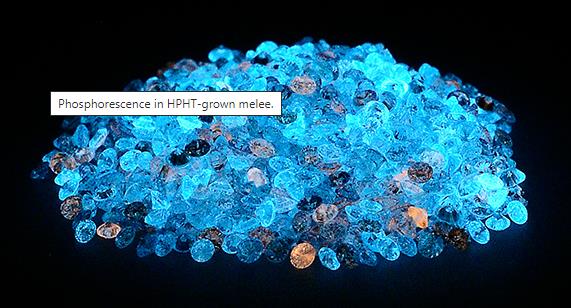
Phosphorescence is a special glow effect seen on some lab-grown diamonds. When you take away the ultraviolet light source, these diamonds can still keep shining for a while. This is a common and interesting feature of many lab-grown stones, especially those made with the HPHT growth method. For daily wear, this trait almost does not change how the diamond looks. However, it is a key clue for gem identification. As a buyer, you just need to learn about this feature and pick diamonds according to your own likes.

What is Phosphorescence?

First, we need to tell apart fluorescence and phosphorescence, because many people mix them up.

Fluorescence means a diamond gives out visible light when exposed to ultraviolet rays, such as UV check lights or strong sunlight. The light will disappear right away once the UV source is removed. You can find fluorescence on both natural diamonds and lab-grown diamonds, so it is really normal.

Phosphorescence works differently. The diamond continues to emit light long after the ultraviolet light is gone. The glowing time can be just a few seconds, or even last for several hours. This phenomenon is extremely rare in natural diamonds, but it is quite typical for certain lab-grown diamonds.

Here is a easy example to help you understand. It is just like the hands on a glow-in-the-dark watch. After absorbing light, the watch hands will glow softly in the dark for some time. That is exactly how phosphorescence acts

Phosphorescence

Why do lab-grown diamonds have phosphorescence?

The appearance of phosphorescence mainly connects with the diamond’s growing technology and tiny defects inside its crystal structure.

The most common cause comes from the HPHT production method. During the HPHT diamond growing process, workers often use catalysts that contain boron. These boron elements help the diamond form faster and also adjust its color.

After boron atoms enter the diamond crystal lattice, they will combine with other defects inside the stone, like nitrogen atoms. The most well-known combination is called B-N pairs, short for boron-nitrogen pairs.

When these B-N defects get excited by ultraviolet light, the electrons inside will jump to a higher energy state. These electrons take a very long time to return to their normal state. While they slowly settle down, they release energy in the form of visible light, and this creates the phosphorescence we see.

Things are a little different for CVD lab-grown diamonds. Most CVD diamonds do not contain boron, so strong phosphorescence hardly show up on them.

Even so, some other small lattice defects may still form during CVD production, such as empty atomic spaces or silicon impurities. These flaws can lead to weak phosphorescence too. Still, the glow usually fades very quickly and comes in different colors.

What does phosphorescence look like?

When a diamond shows phosphorescence, its glow has clear features.

In terms of color, blue-green and yellow-green are the most common types. The exact color depends on what kind of crystal defects exist inside the diamond.

As for lasting time, most phosphorescence only stays for several seconds to a few minutes. Only a very small number of diamonds can glow for hours, but their brightness drops fast from the very start.

How does phosphorescence affect a diamond’s look and value?

We can look at this question from two different sides.

For daily wearing, phosphorescence has no bad effects at all. Under normal natural light or indoor lights, you cannot see the glow. It will not change the diamond’s original color, brightness or sparkle. You will never see your diamond glow on its own when you stand under sunshine or restaurant lights. There is no need to worry about it ruining your wearing experience.

In some special situations, phosphorescence can become a unique highlight or a point that people care about.

Many people think this hidden glowing feature is really cool. For example, when you stay in a nightclub or turn off the lights at home, your diamond will send out soft mysterious light. It makes your jewelry one of a kind.

For professional gemologists, obvious and long-lasting blue-green phosphorescence is an important identification sign. It strongly suggests the diamond is made by HPHT technology. Since natural diamonds with such trait are almost impossible to find, this is a useful testing hint.

In rare cases, super strong and long-lasting phosphorescence may bring strange feelings. If you walk from bright sunlight into a dark place like a movie theater, the glowing diamond may catch other people’s eyes. A small number of customers do not like this unnatural glow and feel uncomfortable with it.

It is important to know that phosphorescence is just a normal physical effect formed during crystal growth. It is not a quality flaw. It will not make the diamond easier to damage, nor ruin its beauty for daily use.

If you do not like glowing diamonds, you can talk to the sellers and ask for stones without phosphorescence. Reliable jewelry stores have professional tools to test and tell you this feature clearly.

Top grading labs like GIA and IGI will check phosphorescence when grading lab grown diamonds. They will write down the result in the Comments section on the official certificate. You may read sentences like “Phosphorescence is present” or “No phosphorescence detected” there.

On the other hand, if you find this glowing effect fun and special, you can also choose such diamonds on purpose. Let this unique feature make your jewelry stand out from others.

Categories
Jewelry Others

HPHT Lab Grown Diamonds

Not all diamonds are worth buying!!!
Both milky tint and brown hue:Tap to see full diamond info
This diamond has milky:Click view detailed diamond information
This diamond has green fluorescence.:View diamond details
This diamond has a cavity:See the diamond details

HPHT is one of the earliest invented ways to make lab-grown diamonds, and this technology is already very mature. HPHT stands for High Pressure High Temperature, which we call high temperature and high pressure method for making cultivated diamonds. This tech copies the natural environment where real diamonds form deep inside the earth’s mantle. The machine used to make synthetic diamonds looks just like a huge pressure cooker. Inside a tiny sealed chamber, workers put carbon materials under extreme pressure, around 5 to 6 GPa, and high temperature from 1400 to 1600 degrees Celsius. Under such conditions, carbon atoms will rearrange and turn into brand new diamonds.

The production steps of HPHT diamonds

First of all, we need to get all raw materials ready. Inside a carefully built press chamber, we place high purity carbon sources, most of them are graphite, and a very small diamond seed crystal.

Next step is adding catalyst. People put metal catalyst into the chamber. It is usually alloy mixed with iron, nickel and cobalt. These metal materials can lower the energy needed for diamond to form under high heat and pressure. It helps graphite change into diamonds much easier.

Then we create the extreme growing environment. Turn on the big press machine. The chamber will get pressure as strong as the place more than 150 kilometers under the ground. The pressure keeps at 5-6 GPa, and temperature stays between 1400℃ and 1600℃ all the time.

After that comes melting and crystal growing. In this tough environment, the metal catalyst melts first, and then it dissolves the graphite carbon. The dissolved carbon atoms move through the hot liquid metal, and stick on the small diamond seed which has a little lower temperature. Little by little, the crystal grows bigger and bigger.

When the growth is done, we start to cool down and release pressure. The whole growing process can take several days or even weeks. After temperature and pressure back to normal, we take out the rough diamond crystal. At this moment, the raw diamond is always covered with metal catalyst on its surface.

The last work is cutting and polishing. Workers clean off all the metal stuff on rough diamonds. Then professional craftsmen cut and polish the crystals carefully. Finally, we get finished diamonds ready to sell.

Features of HPHT diamonds

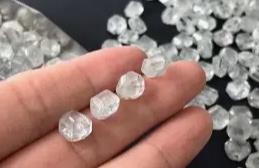
The rough crystals of HPHT diamonds usually have a special shape, mixed with cube and octahedron form. It is totally different from natural diamonds which are mostly octahedron, and CVD diamonds that look like flat plates.

HPHT tech is really good at making colorless diamonds in D-E-F color grade, and blue diamonds too. The blue color comes from boron element inside the crystal. It can also produce many other fancy colored diamonds, such as yellow and yellow-green ones.

Because metal catalyst is used during production, tiny metal inclusions can be found inside some HPHT diamonds. If you look under a microscope, these inclusions are small dark dots with metal shine. What’s more, most of these diamonds have magnetism. You can use a strong magnet to test it, the stone will be attracted.

Famous gem labs like GIA and IGI can do full identification for finished HPHT diamonds. Every official certificate will clearly mark it as Laboratory-Grown diamond, and note HPHT as its growing method. The metal inclusions and unique fluorescence pattern are the main clues for experts to tell HPHT diamonds apart.

HPHT Lab-Grown Diamonds

HPHT and CVD technology comparison

There are two main technologies to make lab diamonds in the market, HPHT and CVD. They work in different ways.

HPHT imitates the underground nature environment. It melts graphite carbon with high pressure and heat, then makes it recrystallize into diamonds. CVD uses gas as raw material. Carbon atoms separate from gas and slowly build up on diamond seeds.

Their crystal shapes are not the same. HPHT diamonds are cube or octahedron shape. CVD diamonds are flat and board-like.

In color performance, HPHT works best for colorless diamonds, blue diamonds and fancy yellow diamonds. Most original CVD diamonds have brown or grey tint. People often use HPHT treatment later to remove the bad color and turn them colorless.

For inclusions inside stones, HPHT has metal inclusions with magnetism. CVD diamonds contain graphite or other non-metal impurities, and they do not have magnetism at all.

When it comes to usage, HPHT is widely used for small diamonds, colorless stones and colored diamonds. It also acts as a color improvement process for CVD diamonds. CVD is more popular for big size diamonds and fancy shaped diamonds in the market.

HPHT is a steady and well-developed lab diamond technology. It gains great reputation for nice colorless and colored diamonds. When you plan to buy one, please check the official certificate first. Learn about its possible magnet feature, and choose honest and reliable sellers. In this way, you can get a satisfying HPHT diamond.

HPHT lab-grown diamonds are real diamonds. They share the same chemical composition, physical property, hardness and optical effect with natural diamonds. They are not diamond simulants like moissanite or cubic zirconia.

The price of HPHT diamonds is much lower. It is only one sixth to one thirteenth of natural diamonds in same grade. Even people with limited budget can afford big and high quality diamonds now. Always ask sellers for certificates from GIA or IGI. The papers can prove the diamond’s real 4C standard and confirm it is lab-grown.

Some HPHT diamonds have weak magnetism because of inner metal inclusions. You can test it with a strong neodymium magnet. This is a normal feature of HPHT diamonds, not a quality defect. But sellers should tell buyers this point clearly before deal. CVD diamonds never have magnetic property.

HPHT has great advantages on cost and efficiency when producing small melee diamonds and colored diamonds, especially blue and yellow ones. A large number of colorless CVD diamonds on sale today are processed by HPHT heat treatment to get rid of unwanted color tone.

Categories
Jewelry Others

CVD lab-grown diamond

Not all diamonds are worth buying!!!
Both milky tint and brown hue:Tap to see full diamond info
This diamond has milky:Click view detailed diamond information
This diamond has green fluorescence.:View diamond details
This diamond has a cavity:See the diamond details

CVD lab grown diamonds

CVD lab-grown diamond is one of the most popular technologies for making lab diamonds right now. It is a kind of gem made by modern advanced technology, and it is exactly the same as natural diamond in all aspects. It gives people a good choice to get bigger and better quality diamonds at a much lower cost. When you plan to buy one, remember to pick reliable sellers and check official certificates carefully.

CVD stands for Chemical Vapor Deposition, its Chinese name is chemical vapor deposition method. This tech can create a natural-like environment inside a lab, and let diamond grow layer by layer. Many people describe it as growing diamonds like planting crops. Workers put a tiny diamond seed into a sealed chamber. Then they fill the space with carbon-rich gas such as methane, and add energy with microwave equipment. The carbon atoms in the gas will fall down on the seed little by little, just like snowflakes. After a period of time, these atoms build up and turn into rough diamond crystals.

The production steps of CVD lab-grown diamonds

First step is preparing the diamond seed. People place a thin slice of natural diamond or existing lab-grown diamond as the base seed, and put it into a sealed vacuum growth chamber.

Next is gas injection. The chamber will be heated up to a high temperature, around 800 degrees Celsius. Then workers pump carbon-containing gas like methane and hydrogen gas into the closed space.

The third step is gas ionization. Microwave energy is used to ionize the mixed gas, turning it into plasma with high chemical activity. In this state, carbon atoms are separated from methane molecules completely.

Then comes carbon atom deposition. Those free carbon atoms float in the chamber and settle on the diamond seed slowly, one layer after another just like fine dust.

After that is crystal growth. All carbon atoms arrange themselves following the standard diamond crystal structure. They keep stacking day after day. This process usually takes several weeks or even longer, until a complete rough diamond crystal is formed.

The last step is cutting and polishing. The rough diamond is sent to professional cutting factories. Experienced craftsmen cut and polish it in the same way they deal with natural diamonds. Finally, the raw stone becomes finished diamond products.

Main features of CVD diamonds

CVD diamonds usually have high clarity. The whole growing process is easy to control, so there are fewer metal catalyst inclusions inside. But they may have special inclusions, such as black carbon or graphite spots.

Most raw CVD diamonds show light brown or grey color tone. Most of them need extra HPHT high pressure and high temperature treatment later. This common industry process can turn them into colorless diamonds graded D to F, or near-colorless ones from G to J. This kind of post-treatment is widely used and well known in the diamond business.

This technology is good for making flat-shaped diamond crystals. It is perfect for producing fancy shapes like princess cut, cushion cut and radiant cut diamonds. However, if people want to make large round brilliant diamonds with CVD method, it will waste more raw materials.

Professional gem labs such as GIA and IGI can fully identify CVD lab-grown diamonds. They will issue formal grading certificates, which clearly mark that the diamond is lab-grown and produced by CVD technology.

CVD VS HPHT, two main lab diamond technologies

CVD and HPHT are the two leading ways to create man-made diamonds in the market. Their working principles are quite different.

For CVD technology, carbon atoms separate from gas and deposit on the seed crystal. It is like growing diamonds from gas. As for HPHT, it simulates the deep underground environment of the earth. Workers melt carbon sources like graphite under extreme high temperature and pressure, then let carbon recrystallize into diamonds.

CVD diamonds mostly form flat plate-shaped crystals. HPHT diamonds often appear in cube or octahedron shapes.

In color performance, original CVD diamonds often carry brown or grey shades. They almost need post treatment to improve color. HPHT diamonds tend to show blue or yellow hints because of boron and nitrogen elements inside, while it is also easy to make colorless HPHT diamonds.

In terms of clarity, CVD diamonds generally have better clarity, and their main inclusions are carbon spots. HPHT diamonds may contain metal catalyst inclusions. Some of them can be slightly attracted by strong magnets.

Nowadays, CVD takes a larger share in the market, especially for medium and large sized diamonds. HPHT is a more traditional method. It is widely used for small diamonds and color enhancement treatment.

It is very important to know that CVD lab-grown diamond is real diamond. It shares the same chemical composition, physical features and optical performance with natural diamonds. Both are pure carbon cubic crystals. Its Mohs hardness reaches level 10. The fire and sparkle of CVD diamonds are no different from natural ones at all.

The price of CVD lab-grown diamond is only one sixth to one fifteenth of natural diamond with the same 4C grade. It has an extremely high cost performance. When shopping, always choose diamonds with official certificates from GIA, IGI and other authoritative organizations. These certificates can prove the true quality of 4C standards, and clearly label the stone as Laboratory-Grown diamond.

Almost all colorless CVD diamonds sold on the market have gone through HPHT post-treatment to remove brown color. This is a normal and acceptable optimization method in the industry. Honest and trustworthy sellers should take the initiative to tell customers about this treatment. On GIA certificates, there will be notes saying Indications of post-growth treatment to record this situation.

As a high-tech product, producing CVD diamonds causes much less damage to the environment compared with traditional diamond mining. It also avoids the problems of conflict diamonds. It fits the eco-friendly and ethical consumption ideas of modern people.

Categories
Others

Diamond Inclusions – Cloud

Not all diamonds are worth buying!!!
Both milky tint and brown hue:Tap to see full diamond info
This diamond has milky:Click view detailed diamond information
This diamond has green fluorescence.:View diamond details
This diamond has a cavity:See the diamond details

Cloud is a very common yet special type of clarity inclusion inside diamonds. It may barely change a diamond’s look, or it can cause serious problems. So you need to learn about it carefully before buying.

What is a Cloud?

A cloud is not a single dot inclusion. It forms when countless tiny pinpoints gather together. These tiny spots are packed so closely that they look like a hazy mist under a 10x magnifying glass. That is why people name this kind of inclusion “cloud”.

In appearance, a cloud usually shows as a pale grey blurry area with no clear edges. It looks just like a soft fog trapped inside the diamond.

How Clouds Affect Diamonds

The influence of clouds varies a lot. It all depends on their density, size and position inside the stone.

GIA report mark cloud inclusion

Mild impact (Most common cases)

If a cloud is made of widely spaced tiny pinpoints and covers only a small area, it will not hurt the diamond’s clarity grade or outer look.

It may just make a small part of the stone a little less transparent under magnification. You cannot see it with your naked eye at all. It will not reduce the diamond’s fire and brightness. Such clouds often appear in diamonds graded VS or SI clarity.

Severe impact: Milky diamond

This is the most risky situation you must watch out for.

When a cloud is extremely large and dense, spreading across most parts of the diamond, it creates a milky haze effect. In the trade, we call such stones milky diamonds.

A milky diamond looks foggy all over, as if covered by a thin white mist. Its transparency and shine drop sharply. The stone turns dull and lifeless. It loses sparkle and fire completely.

Milky diamonds never worth their certified clarity grade. For example, a VS2 diamond with heavy cloud may look even worse than a clean I1 diamond. This is a big trap for buyers, and you should try your best to avoid it.

How to Identify Clouds on GIA Reports

A GIA diamond report is the best tool to check cloud risks.

For diamonds over 1 carat, the report includes a detailed clarity plot. On this diagram, large cloud areas are circled with red dash lines. Red marks stand for internal inclusions, and the label next to it will clearly write “Cloud”.

You should pay extra attention to the comments section on the report. This part tells you whether the diamond is likely to turn milky.

If you read notes like Clouds are not shown or Pinpoints are not shown, you need to stay alert. This means there are too many clouds or pinpoints to mark one by one on the plot. In this case, the risk of getting a milky diamond becomes very high.

Practical Tips for Buyers

Do not worry too much about clouds. Most diamonds with cloud inclusions are fine to purchase, especially those graded VS or higher clarity.

Learn to read professional diamond certificates. Always pick diamonds with official reports from GIA, IGI or HRD. When you get the report, check two key parts first.

Look at the clarity plot to see if the cloud covers a large space. Then read the comments line by line. If you find Clouds are not shown or similar words, think twice before you pay.

Choosing a trustworthy seller is also important. Reputable dealers will filter out milky diamonds in advance. You can ask the seller directly whether the stone is free of milky, brown and green tint. It is better to put this promise in writing on your guarantee document.

If possible, check the real diamond in person. Turn the stone under natural light and watch its performance. A good diamond stays clear and sparkly all the time. If it always looks foggy and never shines bright, it definitely has milky issues. For online shopping, ask the seller to send real shooting videos of the diamond.

To sum up, cloud is a clustered inclusion seen in many diamonds. Sparse clouds do no harm, but large and thick clouds are the main cause of milky diamonds, which ruin shine and value. Read GIA clarity plots and comments carefully, and shop with reliable merchants. In this way, you can successfully stay away from problematic milky diamonds.

Categories
Others

Diamond inclusion – twinning wisp

Not all diamonds are worth buying!!!
Both milky tint and brown hue:Tap to see full diamond info
This diamond has milky:Click view detailed diamond information
This diamond has green fluorescence.:View diamond details
This diamond has a cavity:See the diamond details

Twinning Wisp is a standard term used on diamond grading reports, such as GIA certificates. It is a common natural growth feature inside diamonds, and it is also classified as one type of inclusion. Many people regard it as a regular diamond flaw. To help you fully understand twinning wisp, we will explain this feature in simple points below.

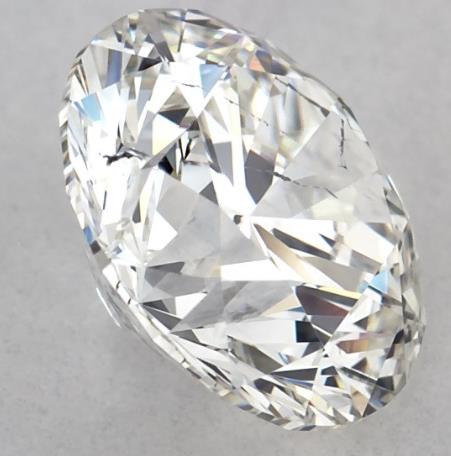
First, let’s talk about how twinning wisp form. Diamonds grow deep underground under extreme high temperature and high pressure. Their crystal structure cannot always grow in a perfect and continuous way. Sometimes the growth direction of crystal lattice will change suddenly, and then a twin crystal structure comes into being. Tiny impurities and other crystal defects may get trapped on the surface of this special structure. When these small substances connect together into lines or patches, a twinning wisp is created inside the diamond.

twinning wisp inclusion

Next is the appearance of twinning wisp. When you look at it under a magnifying glass, you will see lines in white, off-white or transparent color. These lines can be straight, curved or even form a net shape. It never looks like a single small dot. Instead, it shows as thin lines or flat areas inside the stone.

Many buyers wonder: how does twinning wisp affect a diamond? We analyze the influences from three different parts.

The first part is the impact on clarity grade. Top grading labs like GIA clearly mark twinning wisp as an internal inclusion. Professional graders will check its size, quantity, visibility and position carefully. All these factors decide how much it affects the diamond’s final clarity grade. A small and faint twinning wisp will not cause big trouble for high clarity grades, such as VVS and VS. But if the lines are very obvious, or many wisps cross each other inside, the clarity grade will drop down to SI or even I level.

The second part is about durability risk, and this is the most important point you need to know. A twinning wisp is actually a weak zone in the diamond’s structure. If the wisp runs all the way to the girdle or the outer surface of the diamond, the stone will be much easier to crack along this weak line. The risk is higher during daily wearing or diamond setting work. Even professional diamond cutters face big trouble with twinning wisp. The stone is easy to split along the weak structure when cutting and polishing.

The third part is visual effect. In most cases, twinning wisp cannot be seen by naked eyes. You can only find them clearly under a 10x magnifier. Only in very rare cases, when twinning wisps are extremely dense inside, the diamond will look a little hazy. Just like milky diamonds, dense twinning wisps will reduce the stone’s transparency and fire.

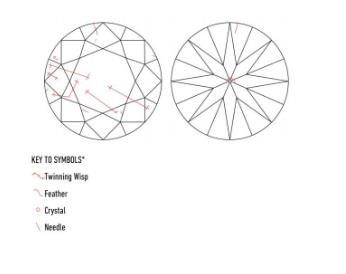
Now let us learn how twinning wisp is shown on a GIA certificate. On the clarity plot diagram of GIA report, twinning wisps are marked with red lines or red areas. Red color stands for internal features on standard grading drawings. The words “Twinning Wisp” will also be written in the notes section beside the diagram.

Here are some useful tips for all diamond customers:

Do not feel too worried about twinning wisp. It is a very common growth feature, and lots of natural diamonds have this inclusion. The key is to check the actual condition of the wisp, not just hear the name.

Learn to read your GIA certificate properly. You can trust the official clarity grade first. If the grade is SI1 or above, including VVS, VS and SI1, normally all inclusions like twinning wisp are invisible to naked eyes. They will not ruin the diamond’s beauty.

Checking the clarity plot is another key step. After you get the certificate, take time to look at the drawing carefully. If the red lines which mark twinning wisp reach the diamond’s edge or girdle, you must pay close attention to the durability risk. You can ask trusted sellers for more details about this stone.

Always choose shops with good reputation. Reliable jewelry sellers will pick out diamonds with serious structural risks in advance. They will also explain all internal features and possible influences to you honestly.

Do not reject a diamond just because it has twinning wisp. You need to judge a stone in all aspects. Cut is the most important factor for diamond sparkle, followed by color, carat weight and overall cost performance. A diamond with tiny twinning wisp but Excellent cut will shine much brighter than a totally clean diamond with poor cut quality.

To make a simple summary. Twinning wisp is a natural growth mark of diamonds. As a kind of inclusion, it will influence clarity grading. The biggest concern is whether the wisp locates near the edge, which may bring crack risks. You can judge the situation easily by reading the clarity plot on GIA certificate. With professional grading reports and trustworthy sellers, you can definitely pick out diamonds that are safe, beautiful and great value for money.

twinning wisp diagram

Categories
Others

What are milky, brown and green tints in diamonds?

Not all diamonds are worth buying!!!
Both milky tint and brown hue:Tap to see full diamond info
This diamond has milky:Click view detailed diamond information
This diamond has green fluorescence.:View diamond details
This diamond has a cavity:See the diamond details

Have you noticed that some diamonds share exactly the same 4C grades, but their prices vary a lot? Today we are going to talk about one key reason behind this gap: milky, brown and green tints. This is a common term in the diamond industry for flawed stones. These unwanted visual issues will make a diamond look dull, lose its fire and transparency, carry odd hues and stop it from sparkling brightly.
Actually, this phrase stands for three different undesirable features. Let’s break them down one by one.
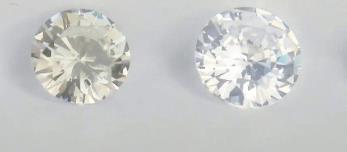
First is milkiness. A milky diamond looks foggy, as if covered by a layer of white mist, and it never looks clear.
What causes a diamond to turn milky?

It is not caused by one big inclusion inside the stone. Instead, there are countless tiny clouds spread all over the diamond. There are so many of these cloud inclusions that lab cannot mark each one out on the clarity plot of the certificate. These tiny clouds scatter the light that enters the diamond. As a result, the stone loses its brightness and fire. Milky appearance greatly ruins a diamond’s clarity and sparkle. It is the most frequent flaw among the three, and you must try your best to avoid it when shopping.

milkiness diamond

Second comes the brown tint. Such diamonds carry obvious brown or coffee-like tones.
Where does the brown color come from?

It is part of the diamond’s natural body color. According to the GIA color grading scale from D to Z, diamonds from grade K down will show visible yellow tones to the naked eye. The brown tint is an extra ugly tone mixed with yellow. It makes the diamond look dark and dirty, weakening fire and transparency. It also ruins the pure white look of the stone, and even makes it seem old and worn.

Third is the green tint. It means a colorless diamond has faint green hues on its surface. Please note this is not the vivid fancy green diamonds which are extremely valuable collectibles. The green we talk about here is an unpleasant greyish-green secondary color. It usually appears together with milky and brown features. This bad tint lowers the overall color quality, makes the diamond look strange and dim, and destroys its pure color tone.

green brown milky tint diamond

Some low-quality diamonds may have one or more of these three flaws at the same time. Professionals divide them into three levels: slight, moderate and heavy. Even if these diamonds have nice certificate ratings, such as G-H color and VS clarity, their real look and market value are much lower than normal diamonds with the same grades.
Now, how can you stay away from diamonds with milky, brown or green tints?
Authoritative certificates are the first step. Always pick diamonds certified by GIA, IGI or AGS. However, these reports will not directly label a diamond as milky or tinted. You need to learn to check the details carefully.
First, read the clarity characteristics section on the certificate. If you see the word Cloud, plus notes like Cloud is not shown or Pinpoints are not shown, or a large number of twinning wisps are recorded, you need to be very careful. These signs often mean massive tiny inclusions inside, which will create a milky effect.
Second, do not choose diamonds with too low color grades. Pick H color or higher, this can largely prevent obvious yellow and brown tones.
Third, buy from trustworthy sellers. Choose stores that provide real photos and videos of each diamond, and clearly promise no milky, brown or green tints. Platforms like Blue Nile and James Allen post detailed videos for every single stone. Watching these videos is the most direct way to avoid problematic diamonds.
To sum up, milky, brown and green tints are big traps for diamond buyers. Nice certificate grades can hide poor actual performance. Always stay alert and check carefully before you pay.